BeastForms User Guide
Learn how to create high-converting forms that generate accurate quotes for your service business.
Table of Contents
Introduction
BeastForms is a dynamic form builder designed to help service businesses generate accurate quotes and capture leads. Unlike standard forms, BeastForms uses intelligent property data and pricing rules to create accurate, instant quotes that convert at an industry-leading rate.
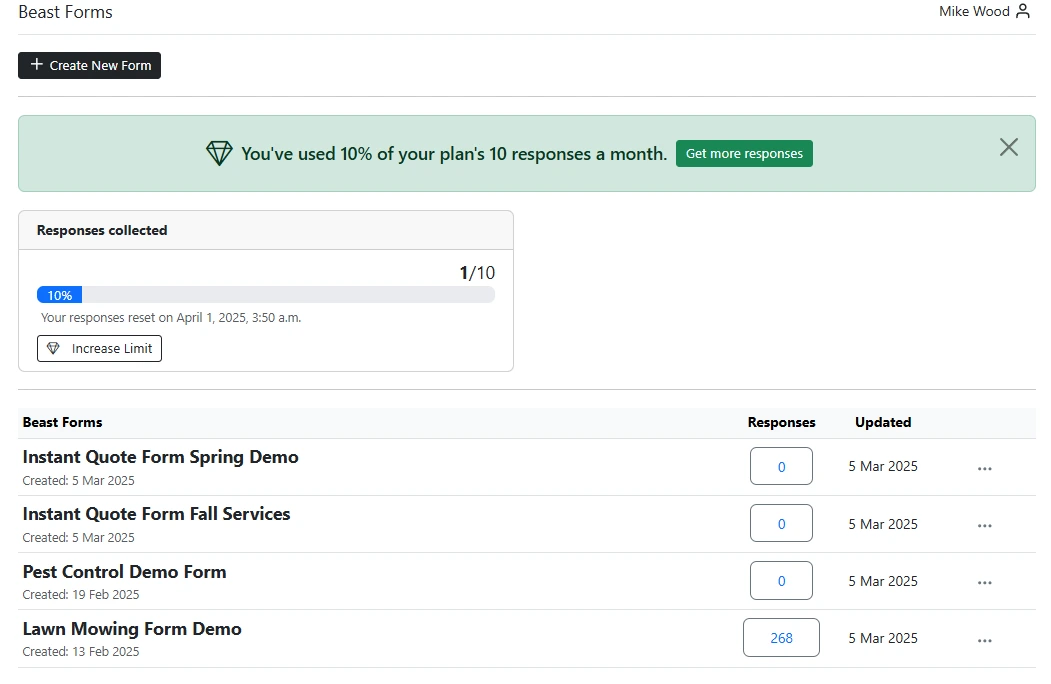
The BeastForms dashboard showing form analytics and performance metrics
Getting Started
What are BeastForms?
BeastForms are intelligent forms that collect information from potential customers and generate accurate quotes based on property data, service requirements, and your pricing rules. They offer:
- Property-based intelligent pricing
- Automatic property data detection
- Smart follow-up questions
- Dynamic pricing adjustments
- High conversion rates (95% of completed forms convert to customers)
Accessing BeastForms
-
Log in to your Lawn Beast dashboard
Access your account through the login page with your credentials.
-
Click on the "Forms" option in the left sidebar
Navigate to the dedicated forms management area in your dashboard.
-
You'll see the BeastForms dashboard showing your usage statistics and existing forms
This overview provides insights into your form performance and creation history.
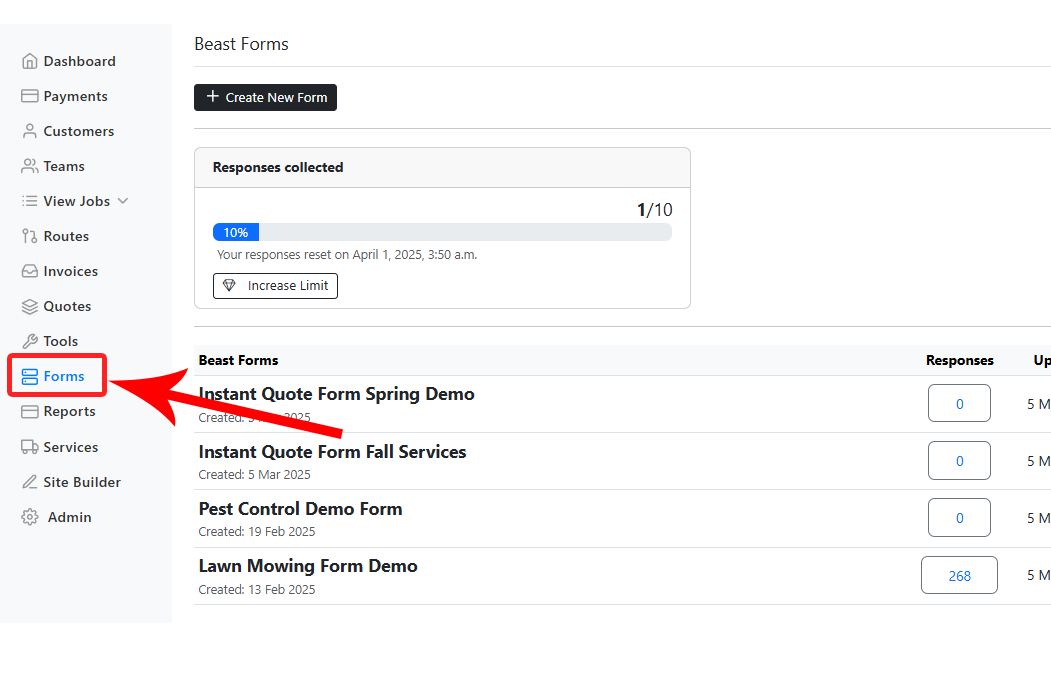
The Forms section in your Lawn Beast dashboard
Creating Your First Form
Step 1: Initiate Form Creation
-
From the Forms dashboard, click the "Create New Form" button
Look for the prominent button at the top of your forms dashboard to begin.
-
A "Select Form Type" modal will appear
This dialog allows you to choose which type of form best fits your needs.
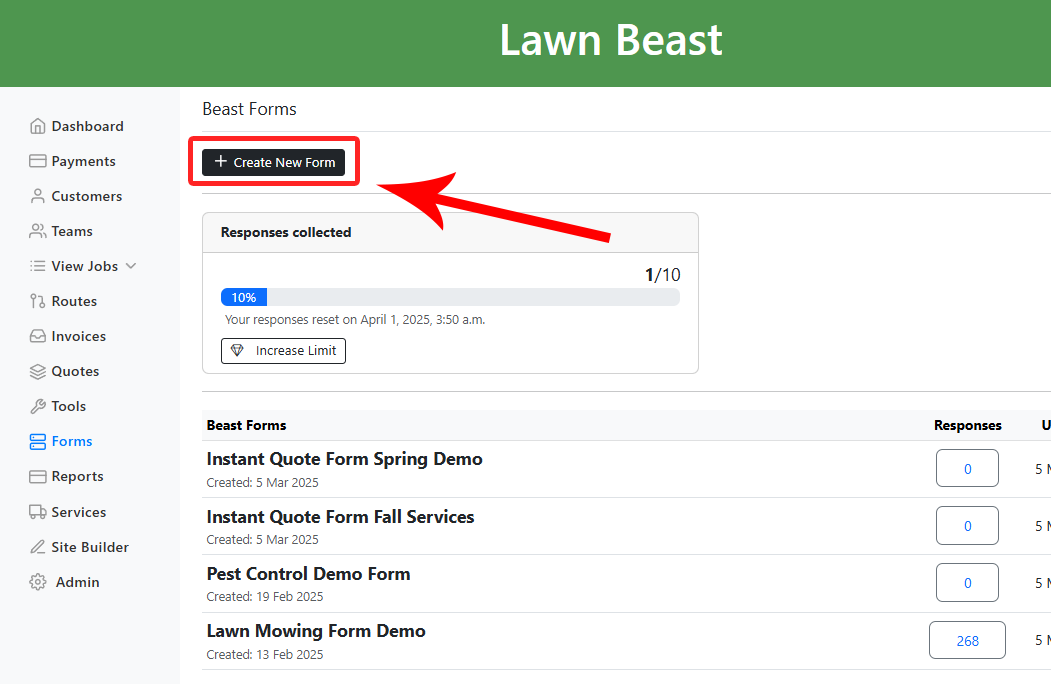
Click the "Create New Form" button to start building your form
Step 2: Select Form Type
Choose from the available form types:
AI/Smart Form
Create smart forms with AI-driven logic for dynamic user experiences.
Best for service quotes, dynamic pricing, and personalized user journeys.
Generic Form Coming Soon
Simple forms for capturing standard information effortlessly.
Best for contact forms, feedback surveys, and simple data collection.
For this guide, we'll focus on creating an AI/Smart Form, which offers the full range of BeastForms features.
-
Select "AI/Smart Form" from the options
Click on the AI/Smart Form card to select this option.
-
Click the "Create" button to proceed to the form builder
This will initialize your new form and take you to the form builder interface.
Building Form Pages
Form Builder Interface
The Form Builder has three main sections:
Pages Panel
On the left side, you'll see the list of pages in your form and can add new pages.
- Default pages include:
- 1. Autocomplete Address
- 2. Choose Services
- 3. Contact Info & Selection Summary
- Form Completion Behavior
- Click the "+" button to add a new page
Preview Panel
The center panel shows a preview of how your form will appear to users.
- Shows the current page being edited
- Updates in real-time as you make changes
- Displays all elements including buttons and form fields
Configuration Panel
The right panel changes based on what you're editing.
- Question Config: For editing question properties
- Services Config: For configuring available services
Form Navigation Tabs
At the top of the Form Builder, you'll see navigation tabs:
- SHARE: Options for sharing your form
- FORM SETTINGS: Configure general form settings
- RESULTS: View form submissions and responses
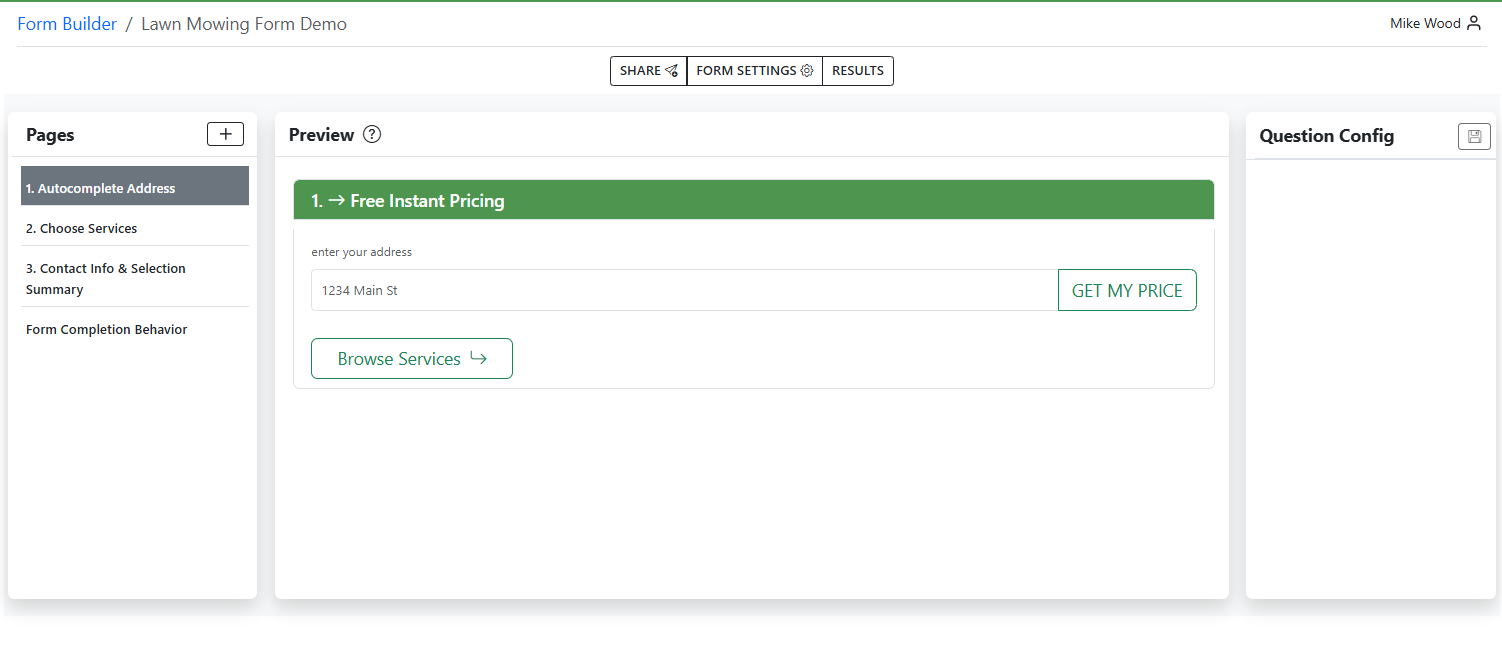
The Form Builder interface showing pages, preview, and configuration panels
Default Page Structure
BeastForms creates a default structure with three main pages:
-
Autocomplete Address
Collects the customer's property address with smart address autocomplete and property data integration
-
Choose Services
Allows customers to select the services they're interested in receiving
-
Contact Info & Selection Summary
Collects customer contact information and shows a summary of their selections
Creating Questions
Adding questions to your form allows you to gather specific information from potential customers:
How to Add Questions
-
Select a page in the Pages Panel
Choose the page where you want to add the question
-
Click the "+" button in the page's section
This will open the question type selection dialog
-
Choose a question type
Select from Text, Multiple Choice, or Single Choice question types
-
Configure the question in the Configuration Panel
Add question text, answer options, and any price modifiers as needed
The question creation interface in the form builder
Question Configuration Options
Each question can be customized with various settings:
- Question Text: The prompt shown to the customer
- Help Text: Optional additional explanation
- Required: Toggle whether the question must be answered
- Visibility Conditions: Control when the question appears based on previous answers
Form Settings and Configuration
Access form-wide settings by clicking the "FORM SETTINGS" button in the top navigation of the Form Builder:
Basic Form Settings
The Form Settings modal contains essential configuration options:
-
Form Title
Enter a descriptive name for your form. This will appear at the top of the page in the browser tab.
-
Form Completion Behavior
Configure what happens after a customer submits the form:
- Show Message: Display a custom thank-you message
- Enter the text you want shown in the message field
- Example: "We've received your request and will be in touch ASAP!"
-
Redirect to Website: Send customers to another page after submission
- Enter the full URL where you want to redirect customers
- Show Message: Display a custom thank-you message
-
Email Notifications
Set up automated communications:
- Send Confirmation Email to User: Toggle to automatically email customers when they submit the form
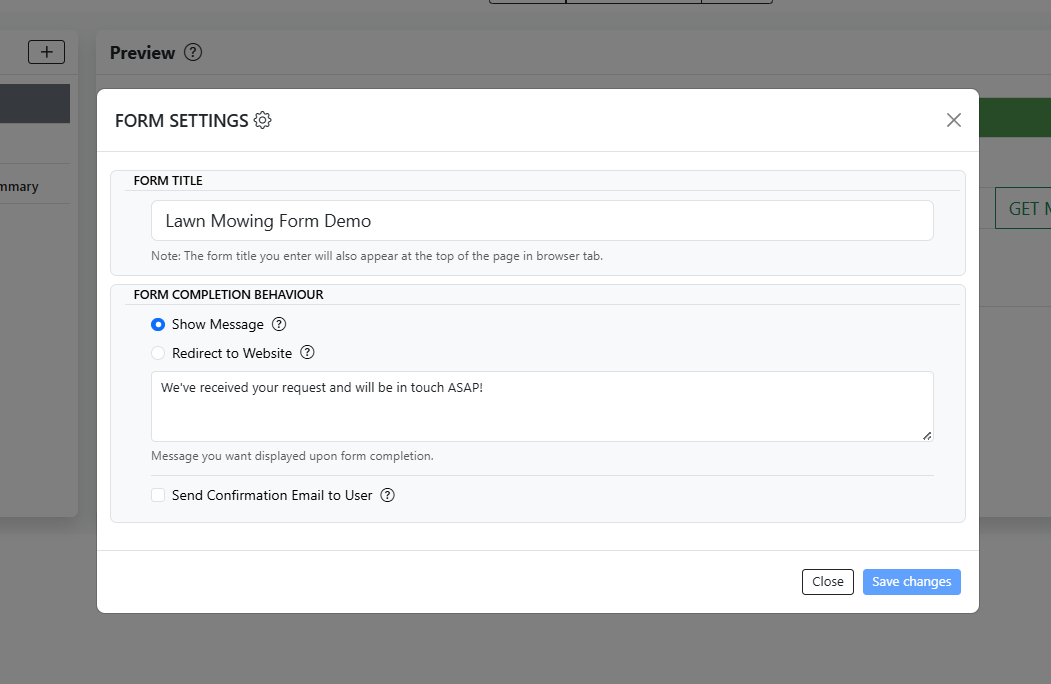
The Form Settings modal showing title and completion options
Service Selection Configuration
The "Choose Services" page allows customers to select which services they're interested in:
Managing Available Services
Before configuring services in your form, you'll need to set up your services:
-
Navigate to the Services section in your Lawn Beast dashboard
Access this by clicking on "Services" in the left sidebar
-
Create New Service
Click the "Create New Service" button to add services like Mowing, Aeration, Leaf Removal, etc.
-
Configure each service with:
- Service Name (e.g., "Mowing", "Aeration")
- Service Description
- Frequency options (e.g., "once", "once, 7, 14" for weekly/bi-weekly)
- Availability months (which months the service is available)
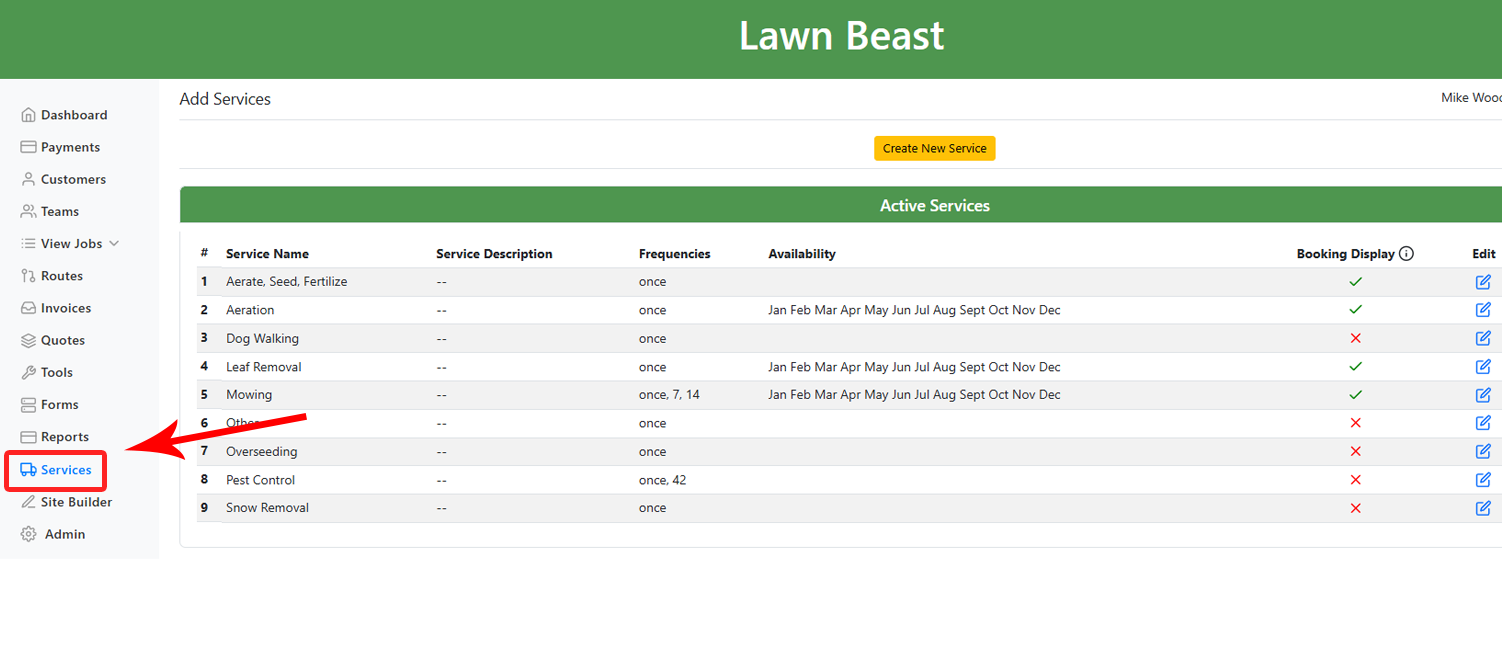
The Services management section showing active services
Adding Services to Your Form
Once your services are created, you can add them to your form:
-
In the Form Builder, select the "2. Choose Services" page
-
Click on "ADD/REMOVE SERVICES" in the Services Config panel
Or click on the "CHOOSE SERVICES TO BE DISPLAYED HERE" message in the preview
-
Select services to display on your form
In the modal window, check the boxes next to services you want to include
-
Click "Save" to confirm your selections
Customizing Service Icons
Each service can have a visual icon to enhance the user experience:
-
Click the "Change" button next to a service in the service selection modal
-
Choose an icon from the icon library
Browse through categories like lawn care, home services, and many more.

Sample of available SVG icons in the library
-
Click on your preferred icon to select it
Service Display Order
Control the order in which services appear on your form:
-
Click "SERVICE DISPLAY ORDER" in the Services Config panel
-
Arrange services in your preferred order
Question Types
BeastForms supports various question types for different data collection needs:
Text Input Questions
Short Text
For brief responses such as additional details, names, phone numbers, or basic information
- Appears as a single-line text input field
- Perfect for follow-up questions that need a brief response
- Example prompt: "Tell me more about what work you'd like done?"
Long Text
For detailed information, special instructions, or project descriptions
- Appears as a multi-line text area with more space
- Allows customers to provide comprehensive information
- Best for questions that require detailed explanations
Choice Questions
Multiple Choice
Allows customers to select multiple options from a list
- Displays as checkboxes with visual icons
- Each option can have price adjustments
- Example: "Which areas need service?" with options like Front Yard, Back Yard, Side Yard
Single Choice
For selecting one option from a list of alternatives
- Displays as visual cards with only one selectable option
- Great for questions with mutually exclusive answers
- Example: "How tall is your grass?" with height range options
Address Input
Special input that captures and validates property addresses
- Autocompletes addresses as customers type
- Automatically pulls in property data
- Used on the "Autocomplete Address" page
Using Questions Effectively
When to Use Text Questions
- Short Text: Best for gathering specific, brief information like "What's the gate code?" or "Any specific areas to avoid?"
- Long Text: Ideal for collecting comprehensive information about a project, special instructions, or detailed requirements
When to Use Choice Questions
- Multiple Choice: Best for "select all that apply" scenarios where multiple selections make sense
- Single Choice: Perfect for questions where only one answer is possible or for categorizing the job
Follow-Up Questions
Follow-up questions allow you to gather specific information based on the services a customer selects:
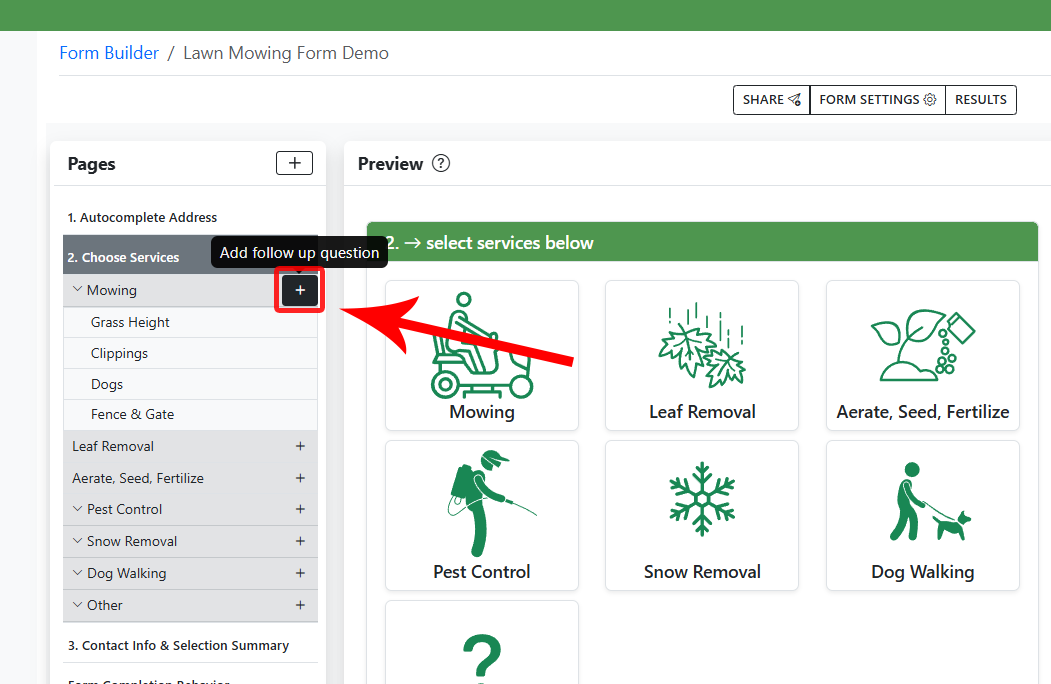
Adding Follow-Up Questions
-
In the Form Builder, go to the "Choose Services" page
-
Find services you've added to your form
They'll appear in the Pages panel under "2. Choose Services"
-
Click the "+" icon next to a service
For example, click the "+" next to "Mowing" to add a lawn mowing-specific question
-
Select a question type from the modal
Choose from:
CHOICES
- Multiple Choice: Let customers select multiple options
- Single Choice: Let customers select one option
TEXT
- Short Text: For brief responses
- Long Text: For detailed information
The Follow-Up Question type selection modal
Example Follow-Up Questions by Service
Lawn Mowing Service
- Grass Height: Multiple choice (Less than 3 inches, 3-6 inches, 6+ inches)
- Property Features: Multiple choice (Slopes, Rocks, Garden beds, Water features)
- Special Instructions: Long text
Leaf Removal Service
- Leaf Coverage: Multiple choice (Light, Moderate, Heavy)
- Leaf Disposal: Multiple choice (Compost, Haul away, Mulching)
- Trees on Property: Multiple choice (Few, Many, Large trees)
Using Follow-Up Questions for Pricing
Follow-up questions can be linked to pricing rules to automatically adjust quotes:
- For example, if a customer selects "6+ inches" for grass height, you could automatically add a tall grass surcharge
- If they select "Heavy" for leaf coverage, you could increase the leaf removal price
Smart Pricing Rules
One of the most powerful features of BeastForms is the ability to create dynamic pricing based on customer responses:
Creating Price Adjustments for Follow-Up Questions
After creating follow-up questions for your services, you can add price adjustments to each answer choice:
-
Select a follow-up question in the Pages panel
For example, click on "Grass Height" under the Mowing service
-
Configure each answer choice in the Question Config panel
For each option (like "Under 5 Inches", "5 to 10 Inches"), you can:
- Select an icon to visually represent the option
- Set the display text for the option
- Configure price adjustments
-
Set the price adjustment type from the dropdown
Choose from:
- Flat Rate: Add a specific dollar amount
- Percentage: Add a percentage of the service cost
- Quote in Person: For complex situations requiring on-site assessment
-
Enter the adjustment amount
Specify how much to add to the base price (e.g., +30% for "5 to 10 Inches" grass height)
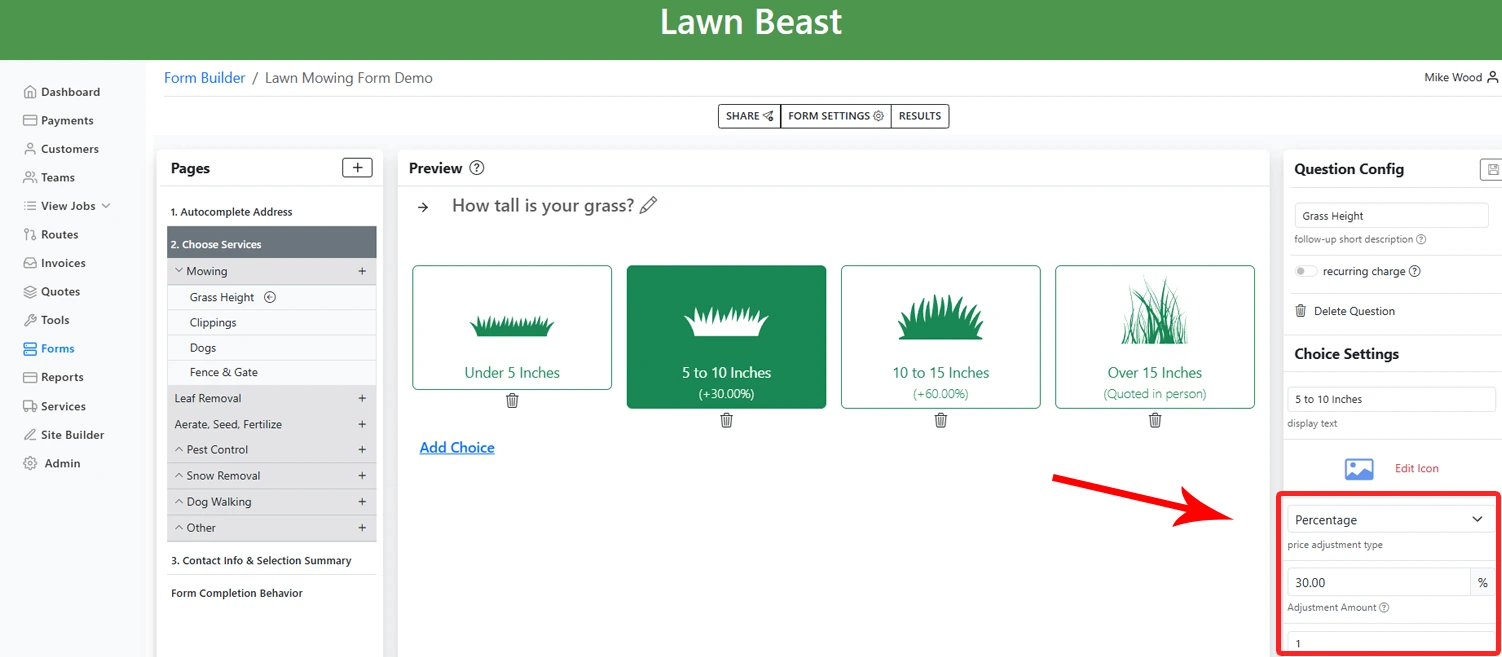
Setting up price adjustments for different grass height options
Example: Lawn Mowing Price Adjustments
Grass Height Question with Price Modifiers
Question: "How tall is your grass?"
Under 5 Inches
Standard rate
5 to 10 Inches
+30.00%
10 to 15 Inches
+60.00%
Over 15 Inches
Quoted in person
Recurring Charges
For subscription-based services, you can toggle the "recurring charge" option:
- When enabled, the price adjustment will apply to each recurring service instance
- When disabled, the price adjustment will only apply to the first service instance
Contact Info & Completion Actions
The final page of your form collects customer contact information and displays a service summary:
Customer Contact Information
The Contact Info section includes standard fields for customer details:
Default Contact Fields
- First Name: Customer's first name
- Last Name: Customer's last name
- Email: Customer's email address
- Phone Number: Customer's contact number
- Additional Comments: Space for any other details
Service Request Summary
Displays a summary of the customer's selections:
- Services: List of selected services
- Sub Total: Price before any adjustments
- Total: Final price with all adjustments
- Submit Request: Button to submit the form
Form Completion Behavior
Configure what happens after a customer submits the form:
-
Click on "Form Completion Behavior" in the Pages panel
-
Configure the completion settings:
- Thank You Message: Customized message to display after submission
- Redirect URL: Optional URL to send customers to after form completion
- Email Notifications: Set up automated emails to yourself and/or the customer
Testing Your Form
Before publishing your form to potential customers, it's important to thoroughly test its functionality:
How to Test Your Form
-
Preview Mode
Click the "Preview" button in the Form Builder to see how your form will appear to users
-
Complete a Test Submission
Fill out your form as if you were a customer to test the full experience
-
Verify Price Calculations
Test different service combinations and follow-up question answers to ensure pricing rules work as expected
-
Check Email Notifications
Submit a test form to ensure email notifications are sent correctly
Publishing Your Form
After configuring all pages and questions, you're ready to make your form available to customers:
Finalizing Your Form
-
Click the "SHARE" button in the top navigation
-
Use the preview link to test your form
This allows you to see exactly how customers will experience the form
-
Submit test responses to verify pricing and notifications
Sharing Your Form
Several options are available for sharing your form with customers:
Direct Link
Share a standalone URL to your form
- Copy the link from the SHARE tab
- Send via email, text message, or social media
Website Embedding
Embed the form on your website
- Copy the embed code from the SHARE tab
- Paste into your website's HTML
QR Code
Generate a QR code for offline materials
- Download the QR code from the SHARE tab
- Add to business cards, flyers, or yard signs
Embedding Forms
Make the most of your BeastForm by integrating it across your digital platforms:
Website Integration
- Use the embed code on your contact page
- Add to service pages for specific offerings
- Create a dedicated "Get a Quote" page
Google Business Profile
- Add your form link to your Google Business Profile
- Set it as the "Request a Quote" button
- Include in your business description
Digital Communications
- Add to your email signature
- Include in customer follow-up emails
- Share in messaging platforms with prospects
Using the Embed Code
-
From the "SHARE" tab, copy the embed code
-
Paste the code into your website where you want the form to appear
This can be placed in any HTML section of your website
-
The form will load seamlessly within your website
It will automatically adopt your website's styling for a consistent look
Example of a BeastForm embedded on a service business website
Viewing Form Responses
Access submitted form data by clicking the "RESULTS" tab in the Form Builder. This provides a detailed view of all customer submissions:
Results Dashboard
The Results page shows all submissions in a list format with essential information:
Response List
Each submission displays:
- Status: Completed, In-progress, etc.
- Submission Date/Time: When the form was completed
- Total: The quoted price for services requested
- Services: Number of services selected
Detailed Response View
When you click on a response, you'll see comprehensive information organized into sections:
Customer Request
- Name: Customer's full name
- Email: Customer's email address
- Phone: Customer's contact number
- Preferred Start Date: When they'd like service to begin
Property Details
- Address: Full property address
- Lot Size: Property size (in acres)
- Lot Size Source: How the lot size was determined
Form Details
- Submitted: Date and time of submission
- Created: When the response was initiated
- Response ID: Unique identifier for the submission
Managing Responses
The responses interface provides several ways to work with your form submissions:
Filtering and Sorting
- View submissions by status (completed, in-progress)
- Sort by date, price, or other criteria
- Use the "Select All" option to perform bulk actions
Response Actions
- Export response data for use in other systems
- Contact customers directly from the response view
- Track which responses have been addressed